Friday, February 27, 2015

Rice-A-Roni Turkey Casserole


Our family is completely hit and miss with casseroles. This one is a huge hit and it is super easy to whip up. Easy to adjust too.

 Rice-A-Roni Turkey Casserole


1 (6 1/2 ounce) boxes chicken rice-a-roni
1 teaspoon chicken soup base
1 lb ground turkey
1 (16 ounce) bags frozen peas


  1. Brown turkey in large skillet. Remove from skillet and place in a serving bowl.
  2. Make chicken rice-a-roni per instructions on box and add 1 tsp chicken soup base.
  3. During the last 5 minute of cooking time for rice-a-roni add the cooked ground turkey and the frozen peas. Stir and replace lid to skillet. When time is up for the rice-a-roni casserole is done.
NOTES: I have subbed a frozen mixed veg from Costco for the peas. Also I have omitted the soup base as well. I always add fresh ground pepper. 

Our family of 4 loves this and the Dad is lucky to get enough for a lunch the next day! Hope you all enjoy!
  Photobucket

Wednesday, February 25, 2015

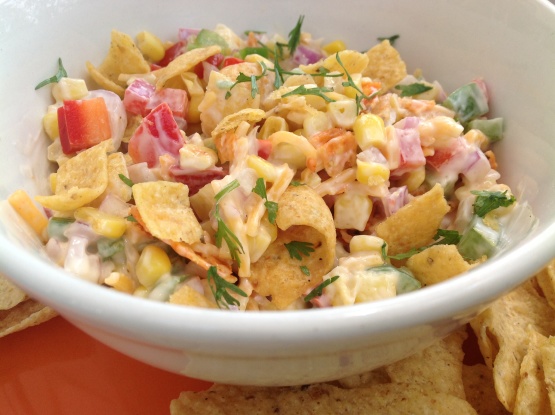
Pot Luck Favorite - Frito Corn Salad


Well the boy had a scout potluck tonight. The girls had other obligations so we had to miss out but the boy requested our corn salad. Again it was a hit. It is so easy to make and super yummy too! I had to buy extra to make some for at home we will be enjoying tomorrow night with supper. So as requested here it is....

Frito Corn Salad
2 cans yellow kernel corn, drained
1/2 red bell pepper, sliced and chopped
1/2 green bell pepper, sliced and chopped
1/2 purple onion, chopped
1 cup mayonnaise
1 cup shredded cheddar cheese
5 ounces of chili cheese flavor Frito corn chips

  1. Mix all the ingredients except the chips.
  2. Add the chips in before serving otherwise the chips will get soggy.
  3. Red peppers are expensive so you can just use green instead.
NOTE: I add seasonings since we don't have the flavored corn chips in Canada. SO I add fresh ground pepper and either season salt or cajun seasoning. 

Hope you enjoy as much as our family does!


Photobucket

Monday, February 16, 2015

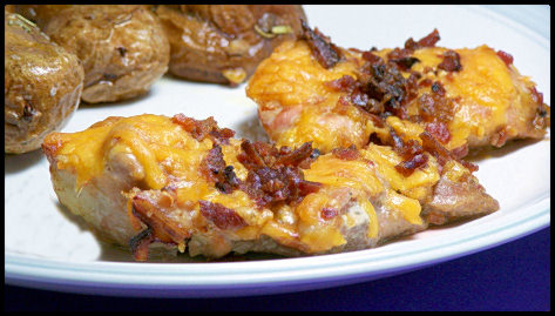
Anniversary Chicken


Well we still are alive but seriously crazy busy. The punks keep me hopping and really with no time for myself but will be trying to post many more recipes for sure! I am trying to get the kids so cook more and be more involved in meal choices and planning.


Anniversary Chicken


2 tablespoons vegetable oil
6 boneless skinless chicken breast halves
1/2 cup teriyaki sauce ( I recommend low-sodium, it seems to be too salty with regular teriyaki)
1/2 cup ranch salad dressing
1 cup shredded cheddar cheese
3 green onions, chopped
1 1/2 ounces bacon bits
1 tablespoon chopped fresh parsley ( for garnish)


  1. Preheat oven to 350°F.
  2. In a large skillet, heat oil over medium-high heat.
  3. Add chicken breasts and sauté 4 to 5 minutes each side until lightly browned.
  4. Place browned chicken breasts in a 9 x 13-inch baking dish.
  5. Brush with teriyaki sauce, then spoon on salad dressing.
  6. Sprinkle with cheese, green onions and bacon bits.
  7. Bake for 25 to 35 minutes, or until chicken is no longer pink and juices run clear.
  8. Garnish with chopped parsley and serve. 
  9. NOTE: we used Caesar dressing (from Coscto) & butterflied out chicken they were HUGE. Also didn't have green onions but will make with chives next time for sure. As well we will next time will put the cheese on in the last 5 mins or so. 
This recipe was a HIT so easy and quick and a kid friendly as well! Hope you all enjoy!
Photobucket

Sunday, September 14, 2014

Still alive & New recipe

Well I haven't fallen off the face of the earth but we are insanely busy. I had surgery at the beginning of July so I was laid up for 8 weeks and trying to be a Mom didn't leave much time for anything else. I haven't done a meal plan yet but will get back onto that as my business have picked up so much that I don't have time for much!

Anyhoooo we have an apple tree that grows super big apples and that has been my focus for the last 2 weeks. Apple Pie Jam, Apple Butter and Dutch apple pies. Well tonight we made....

Apple Pizza - Lynn's Kitchen Adventures

  • 1 pie crust, unbaked single pie crust ( I use my gluten free pie crust recipe)
  • 5 cups sliced peeled apples, tart baking apples work best
  • 2 tablespoons butter
  • 1/2 cup sugar
  • 1 teaspoon cinnamon
Cheese Topping
  • 8 ounces cream cheese, room temperature
  • 1/2 cup brown sugar
  • 1/4 cup caramel ice cream topping
  1. Roll pie crust out onto a 12 inch pizza pan. This will be thinner than a pie crust would be. If you do not have a pizza pan you could do this free form on a cookie sheet.
  2. In a bowl mix together cheese topping mixture and spread on pie crust.
  3. In a separate pan combine  apples, butter, sugar and cinnamon. Cook over medium low heat for 3-5 minutes or until apples are tender.
  4. Spread apples over cream cheese layer. If your apples have a lot of liquid/sauce do not place all of the liquid /sauce on the pizza or you will have a mess in your oven. Ask me how I know. :-) Apples vary on how much juice they have, but you do not want so much liquid that it runs all over the place. I left a few tablespoon of liquid in the pan last time I made it. (You may want to set a second pan on the rack below this in the oven to catch the drips, in case it does go over. That will help avoid a messy oven.)
  5. Bake at 375 for 20-25 minutes.
  6. Cool slightly and serve.
Try it the my whole family loved it!

Photobucket

Wednesday, June 11, 2014

Meal Plan {{June 9th - June 15th}}

Wow I just found that this never posted! Duh! I am having one of those weeks now I have kids that are not feeling well! This am was spent at the walk in clinic and have a kids snuggled on the couch.
Meal Plan {{June 9th - June 15th}}
Monday - Frozen Meal - Chinese Food
Tuesday - (Skating - Soccer) - Taco - Taco in a bag - Taco Salad
Wednesday - (Skating) - BBQ'd buffalo turkey burgers
Thursday - (Skating) - BBQ'd Chicken and fried Potoatos
Friday - Fish and fries
Saturday - Chicken Wings
Sunday -Fathers Day (eat out) or BBQ steak
Photobucket

Sunday, May 25, 2014

Rhubarb Squares


Well tis the season of Rhubarb (that by the way I cannot eat) this is our families favorite dessert of all time! Whipped up some tonight for them to enjoy!

Rhubarb Squares
16 servings.
Filling:
  1. Combine flour and powdered sugar; cut in butter until mixture resembles coarse crumbs.
  2. Press into the bottom of a greased 11-inch x 7-inch x 2-inch baking pan.
  3. Bake at 350 degrees F for 12 minutes.
  4. For filling, combine the first four ingredients in a bowl.
  5. Stir in rhubarb; pour over a warm crust. Bake at 350 F for 35-40 minutes or until wooden pick inserted in center comes out clean.
  6. Cool on wire rack.
  7. Serve warm if desired.
  8. Store in refrigerator.
Photobucket